Kaizen Teams

Dropdown

Table of Contents

Time to read

·

12

Published on

·

May 14, 2020

Last updated on

·

August 18, 2026

Pablo Marcano

Technology

Technology

Setting up Appium for React Native e2e - Automation Testing

Published on

·

August 18, 2026

Last updated on

·

August 18, 2026

Time to read

·

12

Pablo Marcano

End to End (e2e) testing is a technique that helps ensure the quality of mobile applications in an environment as close to real life as possible, testing the continuous integration of all the pieces that integrate a software automatically. On a mobile app, this could be particularly useful given the diversity of real devices and platforms our software is running on top of.

Due to the cross-platform nature of React Native, e2e testing proves to be particularly messy to work on. As a result, we have to write all of our tests bearing this in mind, changing the way we access to certain properties or query elements no matter the tool we use for connecting to it. Still, automation testing tools like Appium and WebdriverIO allow us to work over a common and somewhat standard interface.

The following instructions assume we already have React applications built with expo, and use Jest for our unit-testing solution.

Disclaimer: The following instructions are based on a Windows machine running an android emulator. output/commands may vary slightly on different architectures.

Setting Up Appium

  • Install required dependencies

$ npm i -D webdriverio babel-plugin-jsx-remove-data-test-id concurently

WebdriverIO will work as our “client” for the appium server in the case of JS. There is more to come regarding how to use other clients such as python.

babel-plugin-jsx-remove-data-test-id will help us remove unwanted accessibilityLabels from our mobile app, since that’s the preferred way of targeting elements for both IOS and Android platforms

concurrently will help us automate the running of appium server and jest to do our e2e tests

  • Install Appium Doctor

$ npm install appium-doctor -g

This will help us identify if we have all of the needed dependencies to correctly run appium in an emulator.

  • Run Appium Doctor

Depending on the host OS we want to test in, we could run:

$ appium-doctor --android

or

$ appium-doctor --ios

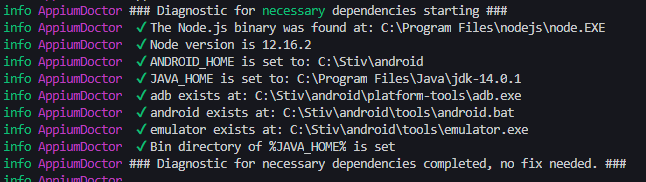
For this particular case I’ll be running the android version. This will prompt some output on the console. If we have all the required dependencies installed we should see a message similar to the following

Code Shot of Appium Doctor Messaging

If not all necessary dependencies are met at this point, instead of checkmarks before any given item you’ll see a red X symbol. Check the end of the input for more information on how to fix the particular Issues you’re prompted.

We’re not going to fix the optional requirements that appium-doctor prompts for the time being, feel free to go over those once you have the testing solution working.

  • Run Appium

By this point, you should be able to run your appium server without any issues, in order to do so just type

$ appium

You should see something similar to

Coding Screen of Appium Doctor Messaging

If you do so, congrats! you have correctly set up appium.

Now, let's set up our tests.

Write tests once, run in any platform

One of the key features of React Native is its ability to write code once and run it in both iOS and Android, that is what we want our mobile tests to behave in the same way. There are some limitations for this, since the only way we can write a selector for both platforms is through the accessibilityLabel attribute in React Native.

This may become an issue if your mobile app depends on accessibility features. Make sure to use correct, semantic and descriptive accessibility labels at any place you intend to use them.

If a great accessibility is not on the scope of your current project (it should), you can use accessibilityLabel as a perfect target for querying your elements, just make sure you don’t accidentally worsen the experience of people using screen readers or any other assistive technology.

In order to do this, we’re going to configure our babel setup to remove the accessibility labels whenever we build for production:

/// babel.config.js
module.exports = function() {
return {
presets: ['babel-preset-expo'],
env: {
production: {
plugins: [
[
'babel-plugin-jsx-remove-data-test-id',
{ attributes: 'accessibilityLabel' },
],
],
},
},
};
};

Let’s write our first test script now:

I’ve created a called LoginTest.spec.js inside a new folder called e2e. Inside the file you can find the following:

// myapp/e2e/LoginTest.spec.js
import wdio from 'webdriverio';
jasmine.DEFAULT_TIMEOUT_INTERVAL = 60000;
const opts = {
path: '/wd/hub/',
port: 4723,
capabilities: {
platformName: 'android',
deviceName: 'emulator-5554',
app: 'my-app-name.apk',
automationName: 'UiAutomator2',
},
};
describe('Expo test example', function() {
let client;
beforeAll(async function() {
client = await wdio.remote(opts);
await client.pause(3000);
const pack = await client.getCurrentPackage();
const activity = await client.getCurrentActivity();
await client.closeApp();
await client.startActivity(pack, activity); //Reload to force update
await client.pause(3000);
});
afterAll(async function() {
await client.deleteSession();
});
it('should allow us to input username', async function() {
// Arrange
const field = await client.$('~username');
const visible = await field.isDisplayed();
// Act
await field.addValue('testUsername');
// Assert
expect(visible).toBeTruthy();
expect(await field.getText()).toEqual('testUsername');
});
});

That may be a lot of new code to digest at once, so let’s go line by line:

import wdio from 'webdriverio';

First, we import the WebdriverIO client. This is the main package that will include the functionality we need to query elements from the react app and simulate events on the emulator.

jasmine.DEFAULT_TIMEOUT_INTERVAL = 60000;

This will tell our test runner (in this case jest) to make the tests error after a certain number of ms have passed. Here we’re setting it explicitly in the test, but if you’re using jest you can modify the testTimeout property on your jest configuration. If you’re using any other test runner, I’d recommend going through their documentation, most of them have a similar property.

const opts = {
path: '/wd/hub/',
port: 4723,
capabilities: {
platformName: 'android',
deviceName: 'emulator-5554',
app: 'my-app-name.apk',
automationName: 'UiAutomator2',
},
};

These are the configurations for our driver to know what to look for when using the appium interface to query and save elements.

You can get the device name going on your emulator > help > about

In order to generate an app from expo, you have to run the command:

expo build:android

And wait in the queue for it to build.

In this case, I placed the downloaded apk in the root folder for my project, and renamed it my-app-name.apk.

Since we’re using WebdriverIO, the automationName will be UiAutomator2, as that’s how appium recognizes it.

Since lines 18-33 are mostly about setup, we won’t focus on that for now. The next part focuses on line 34 and forward.

Writing the actual test

The idea of this test is just to showcase a normal flow on a test, therefore we will be dealing with a fairly simple use case: Checking that we have a valid username input:

const field = await client.$('~username');
const visible = await field.isDisplayed();

The first line allows us to query an item by accesibilityLabel. As I have previously mentioned, for more information about specific selectors go to the WebdriverIO documentation.

The second line checks whether our previously selected item is visible on the current screen, more information here.

await field.addValue('testUsername');

This line simulates user typing into the selected field. In this case, we’re inserting the ‘testUsername’ text inside the previously selected username field:

expect(visible).toBeTruthy();
expect(await field.getText()).toEqual('testUsername');

Lastly, we use Jest to check that the field is indeed visible on our Login Screen, and that the text on the given username field is the same as the one we wrote in it.

Running the test

Since we’re using Jest as our test runner on our React Native app, I’ve set up a command on my package.json to run the appium server and to run Jest in watch mode at the same time. It looks like this:

Screenshot of Command to Run Appium Server

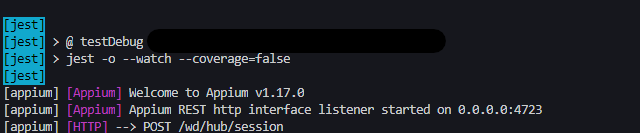
Here we’re using concurrently, a simple npm package that allows us to run several npm scripts at the same time. In this case we run the appium server and jest in watch mode, add their names and different colors to easily recognize them in the console, and pass the standard input to the jest command. This way we can narrow down our tests or do things like run coverage reports.

With this done, we simply have to run npm run test:e2e on our console, and expect something like this:

Lines of code in appium

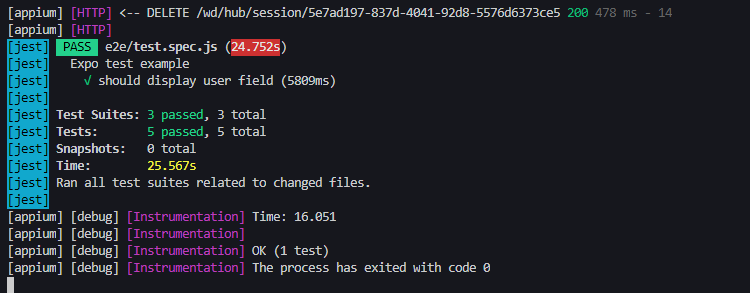
to be run, and something like this:

Lines of code

to be the output. If so, congratulations, you’ve correctly set up your integration tests for your react native app.

Wrapping up

While we’re far away from calling it a day on our e2e react app testing solution, the main automation testing setup it’s done. Next steps include integrating it with a CI/CD pipeline and making it work on IOS platforms.

Further Reading
https://webdriver.io/
https://discuss.appium.io/
http://appium.io/

End to End (e2e) testing is a technique that helps ensure the quality of mobile applications in an environment as close to real life as possible, testing the continuous integration of all the pieces that integrate a software automatically. On a mobile app, this could be particularly useful given the diversity of real devices and platforms our software is running on top of.

Due to the cross-platform nature of React Native, e2e testing proves to be particularly messy to work on. As a result, we have to write all of our tests bearing this in mind, changing the way we access to certain properties or query elements no matter the tool we use for connecting to it. Still, automation testing tools like Appium and WebdriverIO allow us to work over a common and somewhat standard interface.

The following instructions assume we already have React applications built with expo, and use Jest for our unit-testing solution.

Disclaimer: The following instructions are based on a Windows machine running an android emulator. output/commands may vary slightly on different architectures.

Setting Up Appium

  • Install required dependencies

$ npm i -D webdriverio babel-plugin-jsx-remove-data-test-id concurently

WebdriverIO will work as our “client” for the appium server in the case of JS. There is more to come regarding how to use other clients such as python.

babel-plugin-jsx-remove-data-test-id will help us remove unwanted accessibilityLabels from our mobile app, since that’s the preferred way of targeting elements for both IOS and Android platforms

concurrently will help us automate the running of appium server and jest to do our e2e tests

  • Install Appium Doctor

$ npm install appium-doctor -g

This will help us identify if we have all of the needed dependencies to correctly run appium in an emulator.

  • Run Appium Doctor

Depending on the host OS we want to test in, we could run:

$ appium-doctor --android

or

$ appium-doctor --ios

For this particular case I’ll be running the android version. This will prompt some output on the console. If we have all the required dependencies installed we should see a message similar to the following

Code Shot of Appium Doctor Messaging

If not all necessary dependencies are met at this point, instead of checkmarks before any given item you’ll see a red X symbol. Check the end of the input for more information on how to fix the particular Issues you’re prompted.

We’re not going to fix the optional requirements that appium-doctor prompts for the time being, feel free to go over those once you have the testing solution working.

  • Run Appium

By this point, you should be able to run your appium server without any issues, in order to do so just type

$ appium

You should see something similar to

Coding Screen of Appium Doctor Messaging

If you do so, congrats! you have correctly set up appium.

Now, let's set up our tests.

Write tests once, run in any platform

One of the key features of React Native is its ability to write code once and run it in both iOS and Android, that is what we want our mobile tests to behave in the same way. There are some limitations for this, since the only way we can write a selector for both platforms is through the accessibilityLabel attribute in React Native.

This may become an issue if your mobile app depends on accessibility features. Make sure to use correct, semantic and descriptive accessibility labels at any place you intend to use them.

If a great accessibility is not on the scope of your current project (it should), you can use accessibilityLabel as a perfect target for querying your elements, just make sure you don’t accidentally worsen the experience of people using screen readers or any other assistive technology.

In order to do this, we’re going to configure our babel setup to remove the accessibility labels whenever we build for production:

/// babel.config.js
module.exports = function() {
return {
presets: ['babel-preset-expo'],
env: {
production: {
plugins: [
[
'babel-plugin-jsx-remove-data-test-id',
{ attributes: 'accessibilityLabel' },
],
],
},
},
};
};

Let’s write our first test script now:

I’ve created a called LoginTest.spec.js inside a new folder called e2e. Inside the file you can find the following:

// myapp/e2e/LoginTest.spec.js
import wdio from 'webdriverio';
jasmine.DEFAULT_TIMEOUT_INTERVAL = 60000;
const opts = {
path: '/wd/hub/',
port: 4723,
capabilities: {
platformName: 'android',
deviceName: 'emulator-5554',
app: 'my-app-name.apk',
automationName: 'UiAutomator2',
},
};
describe('Expo test example', function() {
let client;
beforeAll(async function() {
client = await wdio.remote(opts);
await client.pause(3000);
const pack = await client.getCurrentPackage();
const activity = await client.getCurrentActivity();
await client.closeApp();
await client.startActivity(pack, activity); //Reload to force update
await client.pause(3000);
});
afterAll(async function() {
await client.deleteSession();
});
it('should allow us to input username', async function() {
// Arrange
const field = await client.$('~username');
const visible = await field.isDisplayed();
// Act
await field.addValue('testUsername');
// Assert
expect(visible).toBeTruthy();
expect(await field.getText()).toEqual('testUsername');
});
});

That may be a lot of new code to digest at once, so let’s go line by line:

import wdio from 'webdriverio';

First, we import the WebdriverIO client. This is the main package that will include the functionality we need to query elements from the react app and simulate events on the emulator.

jasmine.DEFAULT_TIMEOUT_INTERVAL = 60000;

This will tell our test runner (in this case jest) to make the tests error after a certain number of ms have passed. Here we’re setting it explicitly in the test, but if you’re using jest you can modify the testTimeout property on your jest configuration. If you’re using any other test runner, I’d recommend going through their documentation, most of them have a similar property.

const opts = {
path: '/wd/hub/',
port: 4723,
capabilities: {
platformName: 'android',
deviceName: 'emulator-5554',
app: 'my-app-name.apk',
automationName: 'UiAutomator2',
},
};

These are the configurations for our driver to know what to look for when using the appium interface to query and save elements.

You can get the device name going on your emulator > help > about

In order to generate an app from expo, you have to run the command:

expo build:android

And wait in the queue for it to build.

In this case, I placed the downloaded apk in the root folder for my project, and renamed it my-app-name.apk.

Since we’re using WebdriverIO, the automationName will be UiAutomator2, as that’s how appium recognizes it.

Since lines 18-33 are mostly about setup, we won’t focus on that for now. The next part focuses on line 34 and forward.

Writing the actual test

The idea of this test is just to showcase a normal flow on a test, therefore we will be dealing with a fairly simple use case: Checking that we have a valid username input:

const field = await client.$('~username');
const visible = await field.isDisplayed();

The first line allows us to query an item by accesibilityLabel. As I have previously mentioned, for more information about specific selectors go to the WebdriverIO documentation.

The second line checks whether our previously selected item is visible on the current screen, more information here.

await field.addValue('testUsername');

This line simulates user typing into the selected field. In this case, we’re inserting the ‘testUsername’ text inside the previously selected username field:

expect(visible).toBeTruthy();
expect(await field.getText()).toEqual('testUsername');

Lastly, we use Jest to check that the field is indeed visible on our Login Screen, and that the text on the given username field is the same as the one we wrote in it.

Running the test

Since we’re using Jest as our test runner on our React Native app, I’ve set up a command on my package.json to run the appium server and to run Jest in watch mode at the same time. It looks like this:

Screenshot of Command to Run Appium Server

Here we’re using concurrently, a simple npm package that allows us to run several npm scripts at the same time. In this case we run the appium server and jest in watch mode, add their names and different colors to easily recognize them in the console, and pass the standard input to the jest command. This way we can narrow down our tests or do things like run coverage reports.

With this done, we simply have to run npm run test:e2e on our console, and expect something like this:

Lines of code in appium

to be run, and something like this:

Lines of code

to be the output. If so, congratulations, you’ve correctly set up your integration tests for your react native app.

Wrapping up

While we’re far away from calling it a day on our e2e react app testing solution, the main automation testing setup it’s done. Next steps include integrating it with a CI/CD pipeline and making it work on IOS platforms.

Further Reading
https://webdriver.io/
https://discuss.appium.io/
http://appium.io/

Related Articles

View all articles

·

Sep 30, 2026

What to set up before your team starts building with AI coding agents

Set up architecture, agent guidance, and verification in Sprint 0 before your team builds with AI coding agents, so engineers stay in control.

12 read time

Read more

An AI coding agent works with the context your team gives it: existing code, documented decisions, instructions, and reference examples. If that context contains inconsistent patterns, the agent can repeat them.

Before implementation starts, engineering leaders need to define how agents should work and how the team will check their output. Choosing a coding assistant does not make those decisions for you.

For greenfield projects, where the team is building a new codebase, our approach starts with Sprint 0. This is when the team sets the architecture, coding conventions, agent guidance, and verification process.

The setup has two parts: guidance that shapes the agent's work before it starts, and checks that catch problems afterward. With both in place, agents can take on more implementation while engineers stay responsible for how the software is built.

Give agents clear guidance before they build

The codebase is part of an agent's instructions. Its structure and existing implementations show the agent which patterns to follow.

A well-structured starting point gives the agent better direction than an empty repository or inconsistent boilerplate. That makes the team's early decisions important because those decisions become context for future work.

Sprint 0 makes that direction explicit through four elements:

  • Architecture decisions. Record key decisions in lightweight architecture decision records, or ADRs, so agents and developers can refer back to them.
  • Repository instructions. Use a file such as AGENTS.md to define the rules an agent should follow in the repository.
  • Skills and prompt templates. Prepare reusable guidance for recurring workflows.
  • Reference implementations. Keep examples that show the patterns and quality the team expects.

The team also needs to decide what agents can access and do. That includes which files and systems they can see, which tools they can use, what they can change, and which reviews they must pass.

Without enough context, agents have to infer what the team wants. Weak constraints can lead to inconsistent implementations.

Setting those boundaries is part of the engineering work that should happen before agents start building.

Set up verification before relying on agent output

Guidance shapes the work, but the team still needs to check what the agent produces.

That process can include:

  • Review rules for architecture, security, and token usage.
  • Automated tests and linting that check code against defined rules.
  • A sign-off process before changes reach production.

Engineering leaders need to define and maintain these checks. Stronger verification gives the team more confidence to delegate implementation work because problems are easier to detect before they reach production.

As agents take on more implementation, engineers can spend more time on architecture, review, and improving the guidance the agents work from.

Start construction with a clear specification

Implementation needs the same clarity: a description of what the team is building.

In this model, Product explores an idea in a separate environment and validates it with customers. Once the idea is ready for construction, Engineering receives:

  • A behavioral specification.
  • A test plan with acceptance criteria.
  • A link to the prototype for reference.

The experimental code stays in the exploration environment.

We cover that handoff in When PMs can ship code, what changes for Engineering?, including what Product should provide after testing an idea.

During construction, the specification defines the behavior the implementation needs to meet, including edge cases and failure modes. Engineering decides how to implement that behavior within the agreed architecture.

This gives the agent a defined target and gives the developer a clear basis for reviewing the implementation.

Keep engineering judgment in the construction cycle

Sprint 0 prepares the environment, but engineers continue making decisions throughout implementation.

The developer chooses the architecture and reviews the agent's execution plan, including which files it will change and which risks it has identified.

During implementation, the developer supervises the work. Before sign-off, the changes go through manual review, automated checks, and security review.

If the work stops matching the specification or architecture, the developer should stop and reset the cycle.

The guidance from Sprint 0 also needs to evolve. As the team builds, engineers can add new rules and examples, update existing ones, and remove documentation that no longer reflects the codebase.

Maintaining the context agents use becomes part of the development process.

Account for the codebase you already have

This approach is easiest to establish on a greenfield project because the team can set the architecture, conventions, and verification process from the start.

Existing codebases are different. Their previous decisions and inconsistencies are already part of the context an agent sees.

Teams can still introduce the same kinds of guidance and checks. Reaching consistent agent output can therefore take more work.

For a new project, Sprint 0 gives the team a chance to make those choices before implementation begins. Define the architecture, give agents clear guidance, put verification in place, and keep engineers responsible for architectural decisions and release approval.

Then keep that foundation current as the codebase grows.

If your team is starting a new project with AI coding agents, we can help you define the architecture, repository guidance, and verification process before implementation starts.

‍

·

Sep 25, 2026

Build or buy? How AI changed the decision

AI made custom software cheaper to build and SaaS more expensive. How to decide whether to build or buy, and what to validate before committing.

12 read time

Read more

You've said it in a meeting recently. "With AI, could we just build this ourselves?" It's a fair question. And for the first time in a long time, the answer might be yes, but not for the reasons most people think.

AI has changed the cost equation in two ways: custom software is faster and cheaper to build, and teams can test an idea earlier before committing to a full production build. Together, those shifts make building worth reconsidering in situations where it would have been dismissed a few years ago.

TL;DR

AI made custom software faster and cheaper to build. Projects that used to take six months can now take weeks, at half the cost. 

It also made it much cheaper to test an idea, get feedback, and refine what you need before committing to a production system.

Together, those changes open the build vs. buy decision to more companies. The most common mistake is still the same: committing too early, in either direction, before you've tested the problem and the path you're considering.

The old paradigm

For most of the 2000s and 2010s, the standard advice was simple: when in doubt, buy.

Building custom software meant a technical team, months of development, and an upfront investment, typically $100,000 or more, without knowing whether the result would solve the problem. SaaS subscriptions were cheaper, faster, and someone else's problem to maintain. For commodity workflows like payroll, email, accounting, and basic CRM, the math almost never favored building.

This logic was sound. And it still is, for those categories. Mature SaaS tools in commodity categories come with ecosystem value: documentation, integrations, training resources, community support. Building your own payroll system doesn't create competitive advantage. It creates infrastructure you have to maintain.

The problem is that companies applied this rule too broadly, including to the workflows that determine how they compete. The cost of building made that feel reasonable. It wasn't worth it.

For many mid-sized companies, that left an uncomfortable gap: generic tools were no longer enough for the way they operated, but custom software still looked like an enterprise-level investment.

That assumption deserves a second look.

AI changed both sides of the equation

Most of the conversation around AI and software has focused on one thing: building got faster and cheaper. That's true, but incomplete.

The cost of building dropped. A development project that took six to twelve months can now be completed in six to ten weeks. Costs that ran $100,000 or more have come down to $30,000-50,000 for comparable scope, and in some cases less. At Kaizen, our development teams work two to four times faster than before AI-assisted development became part of our process. The cost of the AI is marginal when teams work with clear requirements and structured context. When they iterate without direction, costs add up, but that's a process problem, not a technology one.

The cost of buying is going up. This part gets less attention, but it matters just as much. SaaS companies are embedding AI capabilities into their products and charging for them, separately. A platform that cost $12,000 per year is now $30,000-40,000 once you add the AI tier, the analytics add-on, and the integrations your operations need. For niche tools serving specialized industries, the pricing was already high and the functionality already limited. Add AI tiers on top and the three-year cost comparison starts to look different than it did when you last ran the numbers.

The result is that the two lines are crossing. Custom software is getting cheaper. SaaS, especially for complex or industry-specific use cases, is getting more expensive.

Most companies are still making this decision based on what building cost three years ago.

There's one more thing AI changed that doesn't get enough credit. It lowered the cost of being wrong early. A functional prototype that used to take weeks of development time can now be assembled in days.

That gives teams something concrete to react to, learn from, and change before deciding whether a full build makes sense.

When building makes sense now

The conditions for building have shifted, but the logic hasn't changed entirely. Building still makes most sense when two things are true:

  1. The workflow is part of how you differentiate.
  2. You understand it well enough to start defining what you need.

That second condition doesn't mean having every requirement figured out upfront. It means knowing the business and the process well enough to test assumptions, get feedback, and make increasingly specific decisions.

Companies that start building without that understanding can build the wrong thing faster. The speed advantage AI creates doesn't help if it's pointed in the wrong direction.

Some indicators that a workflow is worth owning:

You're working around your SaaS tools. Spreadsheets patching gaps in a platform. Manual re-entry because two systems don't talk. A Zapier automation that everyone is afraid to touch. These are signals that the tool is containing your problem, not solving it. You're paying the SaaS subscription and building a workaround on top of it. At that point, you're paying twice.

The workflow is where your competitive advantage lives. A logistics company with a particular, high-complexity routing and load assignment process is in a different situation than one that needs basic route planning. The first company's process is their edge, and owning that software means no vendor can change the pricing, pivot the product, or get acquired and leave them exposed. A standard CRM, by contrast, is rarely where a sales organization wins. Salesforce's roadmap reflects the priorities of thousands of customers. If your competitive advantage depends on a process that no SaaS vendor will prioritize, you can't buy your way there.

You shouldn't be adapting your processes to fit a tool. The tool should fit your processes. This is a signal for building: when a company has spent years reshaping how it operates around what a SaaS product can and can't do. That's the opposite of what software is supposed to accomplish. Custom software eliminates that inversion. It's built on domain expertise: knowledge of how your business operates. The software adapts to you.

Vendor dependency is a strategic risk. If a price increase, product pivot, or acquisition could disrupt your operations, you're already exposed. Ownership changes that exposure. It also changes your negotiating position if you stay with a vendor: companies that can credibly leave get better terms.

When buying still makes sense

None of this makes custom software the default answer.

For commodity workflows, buying is still faster and lower-risk. Payroll, basic CRM, email, project management, accounting: these categories have mature tools with strong ecosystems. Build a custom solution here and you've committed to recreating the documentation, integrations, training, and community support that already exist in the products you'd replace. That's rarely worth it.

When your process is still maturing, buying can teach you. A company implementing HubSpot is also adopting a structured methodology for sales, one they can refine as they learn. If you don't know what your ideal process looks like yet, building locks you into one version of it before you've earned the right opinions. Sometimes the right move is to buy, learn, and build later with better information.

When you can't realistically own what you'd build, buying is still the right answer. Custom software is an asset with ongoing maintenance requirements: security patches, library updates, performance monitoring, and someone accountable when things break. If your organization doesn't have that capacity internally, or doesn't have a committed external partner, a build will depreciate without upkeep. Be honest about this before you start.

What AI doesn't change

Two things remain constant, and underestimating either one is expensive.

A prototype is not a production system. AI makes it possible to build a working one in days, but its value is simpler than most people assume: it gives your team something concrete to react to, and those reactions reveal what you need.

One of the most expensive problems in software projects is teams discovering, weeks or months in, that they never agreed on what they were building. Everyone had a mental model. Nobody had tested whether those models matched each other. Show someone a working screen and they'll tell you five things they didn't know they thought until they saw it. That conversation, the one that surfaces the implicit assumptions, the disagreements, the things everyone knew but nobody said, is what the prototype is for.

Building from the requirements that come out of those conversations is a different project than building from initial assumptions. The prototype's purpose is to get you to better requirements faster. Production is a separate project, built from what you learned.

What AI doesn't do is replace the expertise required to architect a system that's secure, scalable, and maintainable over time. Security, data structure, integration design, and long-term ownership decisions don't go away because a prototype came together quickly. A fast prototype that moves to production without rethinking those decisions can accumulate technical debt that costs more than the original development savings. Moving fast into the wrong architecture isn't a win.

AI still needs context. Most teams carry knowledge that's never been written down: how things work, why a decision was made three years ago, what the exception to the rule is. AI doesn't pick that up. Neither does a development partner who starts building without asking the right questions. Explicit requirements matter more now, not less, because the tools that execute on those requirements are faster.

How to decide

Before committing to either direction, three questions are worth working through.

1. Is this process differentiating, and do you know it well enough to define it?

If your answer to the first part is yes, make sure your answer to the second part is honest. 

You don't need every requirement upfront. But you do need enough domain knowledge to describe the process, identify what makes it different, and use prototypes or other forms of validation to refine what the system needs to do.

If the answer is "we know how it works but we've never written it down," that work comes first, regardless of whether you build or buy.

2. What does the cost comparison look like over three years?

Include SaaS licensing at realistic price growth (most contracts escalate), implementation, training, integrations, and the cost of the workarounds your team already maintains. Then include the cost to build, plus what realistic ongoing maintenance looks like. The gap is usually narrower than the initial subscription price implies. If you've never run this comparison for your situation, you're deciding without the information you need.

3. Do you have the capacity to own what you'd build?

This means a specific person or team is accountable for what happens after launch, not "we'll figure it out" or "the vendor will handle it." If that accountability isn't concrete and named, the risk profile of building shifts, and buying may still be the right answer even if the cost comparison favors building.

Before you build or buy, validate the path

You don’t need to start building to find out whether building is the right path.

An AI Validation Sprint helps you evaluate the problem, the workflow, and the options before committing significant time or budget. Depending on what you already have, that might include reviewing your current process, comparing existing products, testing key assumptions, or building a lightweight prototype where seeing the workflow in action would help answer an open question.

The goal is to answer questions like:

  • Is the problem clear enough to solve?
  • Could an existing product meet the need without forcing major compromises?
  • What would custom software need to do differently?
  • Which assumptions should we test before making a larger investment?
  • What are the main technical and operational risks?
  • Does the evidence point toward building, buying, or doing more validation first?

Sometimes the answer is to build. Sometimes it’s to buy. We’ve recommended products like Shopify when an existing platform was the better fit, even when custom development was an option.

And if you already have an AI-built prototype, the same process can assess what’s solid, what only works under demo conditions, and what would need to change before it could become a production system.

The goal is not to justify a build. It’s to give you enough evidence to choose the path that makes sense for your business.

Ready to evaluate your options? Start with an AI Validation Sprint.

‍

llms.txt